For week two we attempted to print a couple test sample and I failed at getting my object to pipe!
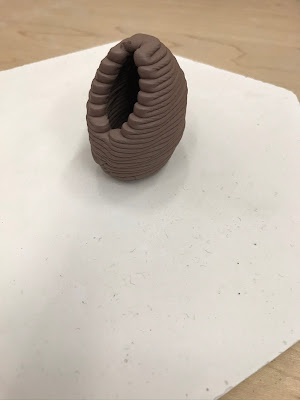
 The print of my sample went very smoothly, the clay stuck to the bed and even though the sample was smaller than I had planned, I ended up scaling it so the layer thickness was the correct height, it printed well. The top bridged without a problem, though I would change the design so this wouldn't be an issue and again I would increase the scale so that the surface pattern would be more visible.
For the final collaborative project I think I would still like to include an offset opening like in this test sample if we do a vessel but I would like to try to do one with a different tool path like the one we tried in class last week so that the opening is smoother...although I like that you can see the process clearly in this one.


 I think for our first print on Monday we may have had some beginners luck, because when we tried Jasmine's we struggled to get the clay to stick to the bed. We ended up moving the zero/home position a few tenths closer to the bed and also included a base layer before moving up the print. This kind of worked bu we still had to press it down at times. In the end Jasmine's test turned out great, she included some droo-loops in the print that I think we are going to try to include in the final project.
For my test object I attempted to pipe in Grasshopper but I've failed miserably...
I tried adjusting the length of the segments, simplifying the pipe (not sure what that is supposed to do) and changing the pipe end from none to flat to round and still it looks like a ball of spiky pipes...Help please!!!
Here is my spiky pipe ball...


I will update with some renders when I can figure out the piping troubles and with images from my team when I get them.
Here are some more images of the print in progress 😃


 The print of my sample went very smoothly, the clay stuck to the bed and even though the sample was smaller than I had planned, I ended up scaling it so the layer thickness was the correct height, it printed well. The top bridged without a problem, though I would change the design so this wouldn't be an issue and again I would increase the scale so that the surface pattern would be more visible.
For the final collaborative project I think I would still like to include an offset opening like in this test sample if we do a vessel but I would like to try to do one with a different tool path like the one we tried in class last week so that the opening is smoother...although I like that you can see the process clearly in this one.


On another note for my print I was really happy that I was able to get the start extrude function in the right place (just after the first G code x,y,z of the print), or at least I think its the right place! At first I tried to change the start extrude index to 4 because it was number four in the final list but then realized that it needed to be changed to 1 because the other insert texts were inserted after the start extrude command.
I do have a question about the code - how were we able to open the Gcode file in text? I wanted to double check that the start extrude was showing up in the right place but I could get it to open...

When we first set up the print we also found that the clay wasn't extruding out of the nozzle so we took the nozzle off and cleared the dried clay out (it was Monday so maybe too much had dried) and got it to extrude just a bit without the nozzle first then it worked great.
 I think for our first print on Monday we may have had some beginners luck, because when we tried Jasmine's we struggled to get the clay to stick to the bed. We ended up moving the zero/home position a few tenths closer to the bed and also included a base layer before moving up the print. This kind of worked bu we still had to press it down at times. In the end Jasmine's test turned out great, she included some droo-loops in the print that I think we are going to try to include in the final project.
Here are some videos of our failed attempts!
For my test object I attempted to pipe in Grasshopper but I've failed miserably...
I tried adjusting the length of the segments, simplifying the pipe (not sure what that is supposed to do) and changing the pipe end from none to flat to round and still it looks like a ball of spiky pipes...Help please!!!
Here is my spiky pipe ball...


I will update with some renders when I can figure out the piping troubles and with images from my team when I get them.
Here are some more images of the print in progress 😃


Comments
Post a Comment